Docker 101
Hello everyone and welcome to a new chapter in my learning journey.
Today I present you with a new chapter on Docker. This has been on the back burner for a while and I am excited to finally being tackling it.
Let's start with the problem that gave birth to Docker.
"It works on my computer"
The concept of containers was born to solve these issues, similarly to Python environments that we can share in .yml files so that our team mates can have all the libraries (in the versions) that we used. With containers we can solve:
- Dependency Management by packaging applications and their dependencies into containers, ensuring that they run consistently across different environments without conflicts.
- Consistency Across Environments: such as development, testing, staging, and production environments. With a consistent environment for running applications, regardless of the underlying infrastructure, operating system, or dependencies, we ensure that applications behave the same way in every environment.
- Isolation and Security: containers provide isolation for running applications, ensuring that they do not interfere with each other or with the host system, minimising the impact of potential security vulnerabilities.
- Portability: containers are portable, allowing developers to build applications once and deploy them anywhere, whether it's on a developer's laptop, in a data center, or in the cloud.
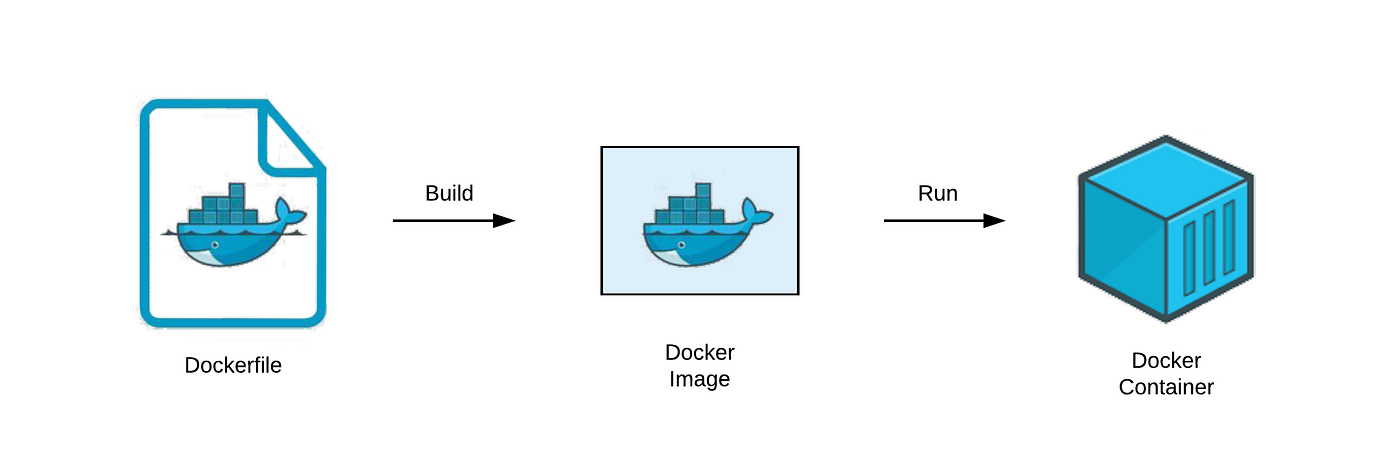
Docker File, Images and Containers
According to their website, Docker Engine is an "open source containerization technology for building and containerizing your applications", Which is very well put but can be summarised as "Docker is a way to package software so it can run on any hardware. And we package software using containers.
Docker Files
Docker Images
Docker Container
A Docker Container (DC) is a running process of the image used to create it. We can have multiple containers made from the same image, running simultaneously in the same or different machines. A DC is a standard unit of software that packages up code and all its dependencies so the application runs quickly and reliably from one computing environment to another.
Containers provide a consistent and isolated environment for running applications, allowing them to run reliably across different computing environments, from development to production. They are based on operating system-level virtualization, which means they share the kernel of the host operating system but have their own isolated filesystem, processes, and networking. This isolation ensures that containers do not interfere with each other and provides security and consistency for running applications.
Summary
- A Docker File is a blueprint for building a Docker Image
- A Docker Image is a template for running Docker Containers
- A Docker Container is a running process
Getting started


- $docker help: shows you the complete list of docker commands
- $docker ps: this command give a list of all running containers in your machine. It is worth noting that each container has a unique ID and it is link to a Docker Image
First Docker File
- FROM <image> - this specifies the base image that the build will extend.
- A base image in Docker is the starting point for building a Docker image. It is the foundational layer upon which you build your custom image. It can be a minimal OS image, like Ubuntu or Alpine, or it can be an image that contains a specific runtime environment, like Node.js, Python, or Java.
- WORKDIR <path> - this instruction specifies the "working directory" or the path in the image where files will be copied and commands will be executed.
- COPY <host-path> <image-path> - this instruction tells the builder to copy files from the host and put them into the container image.
- We can use a .dockerignore file to specify folder or files that we want Docker to ignore in this step (similar to .gitignore)
- RUN <command> - this instruction tells the builder to run the specified command. The command has the same syntax as if we were opening a terminal session and typing a command.
- The commands can be written in shell form or exec form
- ENV <name> <value> - this instruction sets an environment variable that a running container will use.
- EXPOSE <port-number> - this instruction sets configuration on the image that indicates a port the image would like to expose.
- USER <user-or-uid> - this instruction sets the default user for all subsequent instructions.
- CMD ["<command>", "<arg1>"] - this instruction sets the default command a container using this image will run.
- Note: there can only be one CMD command per dockerfile
- The commands are written in exec form (preferred way to do commands in Docker, why? it doesn't start a shell session)
- Determine your base image
- Install application dependencies (*)
- Copy in any relevant source code and/or binaries
- Configure the final image

Build and Run a Docker Image
- $docker build <options> <path to dockerfile>
- With the option -t <tag_name> we can define an alias for the image so that we can identify it later
- Note: to implement port forwarding from a dock container to our local machine we need to use the option -p <port_number in local machine>:<port_number in container>
- Example: $docker run -p 5000:8080 example_tag
Closing Containers
Docker Volumes
- To create a volume: $docker volume create <volume_name>
- --volume option: this is the older and more established way to mount volumes in Docker. It has a simpler syntax but fewer features compared to --mount.
- syntax: $docker run -v [host-path:]container-path[:options] image
- example: $docker run -v /my/host/path:/container/path:ro my-image
- --mount option: it is the newer, more flexible way to mount volumes. It provides a more expressive and clear syntax and supports more advanced features.
- simple syntax: $docker run --mount source=[host-path],target=[container-path] my-image
- example: $docker run --mount source=/my/host/path,target=/container/path my-image
Managing Volumes
- $docker volume ls : list all volumes
- $docker volume rm <volume-name-or-id> : remove a volume (only works when the volume is not attached to any containers)
- $docker volume prune : remove all unused (unattached) volumes
Debugging containers
Docker Compose
- This centralizes configuration and simplifies management. It's easy to set and manage environment variables.
- You can run containers in a specific order and manage network connections easily.
- You can simply scale individual services up or down within the multi-container setup. This allows for efficient allocation based on real-time needs.
- You can implement persistent volumes with ease.
The Compose File
- Version (obsolete) and name top-level element
- Services top-level element:
- A Compose file must declare a services top-level element as a map whose name_key are string representations of service names. Each service is a container. A service definition contains the configuration that is applied to each service container.
- Each service may also include a build section, which defines how to create the Docker image for the service.
- Network top-level element (optional)
- Networks are the layer that allow services to communicate with each other.
- Volumes top-level element (optional)
- The top-level volumes declaration lets you configure named volumes that can be reused across multiple services. To use a volume across multiple services, you must explicitly grant each service access by using the volumes attribute within the services top-level element.
- Configs top-level element (optional)
- Secrets top-level element (optional)

Running the Docker Compose
Related concepts:
- Kubernetes
- Swarm
- Docker versus Virtual Machines
Thank you to:
- The official Docker website
- Learn Docker in 7 Easy Steps - Full Beginner's Tutorial by Fireship
-
https://github.com/docker/welcome-to-docker
Comments
Post a Comment